


So you want to export the individual instruments played in Superior Drummer as audio files? Easy! Here's a step by step way to do it. For this tutorial, I'll be using Cubase 5.
First, create a new empty project in Cubase, and after it opens, click on Devices/VST instruments, and select Superior Drummer:

Note that I'm not using the usual function of adding a VST instrument track; this is important. If you add a normal VST instrument track, you won't be able to use SD's multiple outs. Make sure to use this method.
When you add the instrument, Cubase will ask you if you want to create a MIDI track assigned to Superior Drummer – go ahead and click Create.

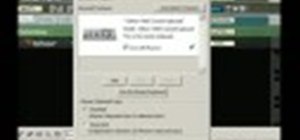
Now, in Superior drummer, click on the MIXER button, and in the mixer window, in theOUTPUT row, click the orange text which reads "Out ½" – the menu that appears will have many options; we want to select "Multichannel".

Now, go back to your VST instruments panel in Cubase, and in the row for Superior Drummer, you'll see a button next to the E button which is used to open the mixer window for the VST instrument. This is the outputs button. Click on it, and click "Activate All Outputs":

Now that you've done that, look at your Cubase project window; you'll notice that you've got multiple channels – one for each of the outputs in Superior Drummer:

Now, go back into Superior Drummer, and open your MIDI Grooves, and browse to the one of your choice:

Now, drag this MIDI groove onto the MIDI track that Cubase created for you at the beginning of this project, and the MIDI will appear in your project window pane. Click on the MIDI clip to select it, and then right click it; in the menu that pops up, select Transport/Locators To Selection:

Now, hit play on the Cubase transport. You'll see that each of the tracks (as long as there's an instrument playing on it) will be showing output:

It's a good idea at this time to name those tracks to match those in Superior Drummer:

Now, let's say we want to export the Kick to an audio wave file, so we can use it in other productions, or effect it with audio effects. Simple! Solo the Channel assigned to the kick drum: 
If you're playing back audio, you should only hear that kick drum now.
Now, click on File/Export/Audio Mixdown:

In the window that appears, name your track, select where to save it, and under the "Import into Project" heading, select "Audio Track". This will create a new audio track with that Kick drum wave file on it; you can also import it into your Pool, if you wish.

When you're done, hit "Export", and exit the audio exporter when you're done. When you go back into the project pane, you'll see that you've got a brand new Wave file on a new audio track; this is your Kick drum!

You can repeat this process for all of the drums you wish to export and use as audio files, and then do with them what you wish!
I hope you found this useful. Happy drumming!
-Brian
Just updated your iPhone? You'll find new emoji, enhanced security, podcast transcripts, Apple Cash virtual numbers, and other useful features. There are even new additions hidden within Safari. Find out what's new and changed on your iPhone with the iOS 17.4 update.

Be the First to Comment
Share Your Thoughts