

INTRODUCTION
In this world of Internet era, almost everyone wants to create theirs own web presence by either hosting their own blog, articles, photos, videos, reviews, etc etc . But some people choose their own way and decide to have something bigger! What is it? Its a website! It feels so cool to have a website under your own name or group, so that you can proudly walk forward to your friends and say "Yes, I have my own website". And your friends standing with their mouth open thinking "Oh my god, this guy is wonderful, he has his own website!!". But the truth is that this things no longer happen because having a website is now as easy as having humans around you...lol!
WHAT YOU WILL LEARN HERE?
Here you will learn how to create web pages using basic HTML knowledge. But if you are very creative and doesn't stop experimenting then you can create amazing web pages by just knowing the information provided here.
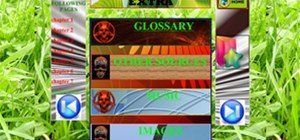
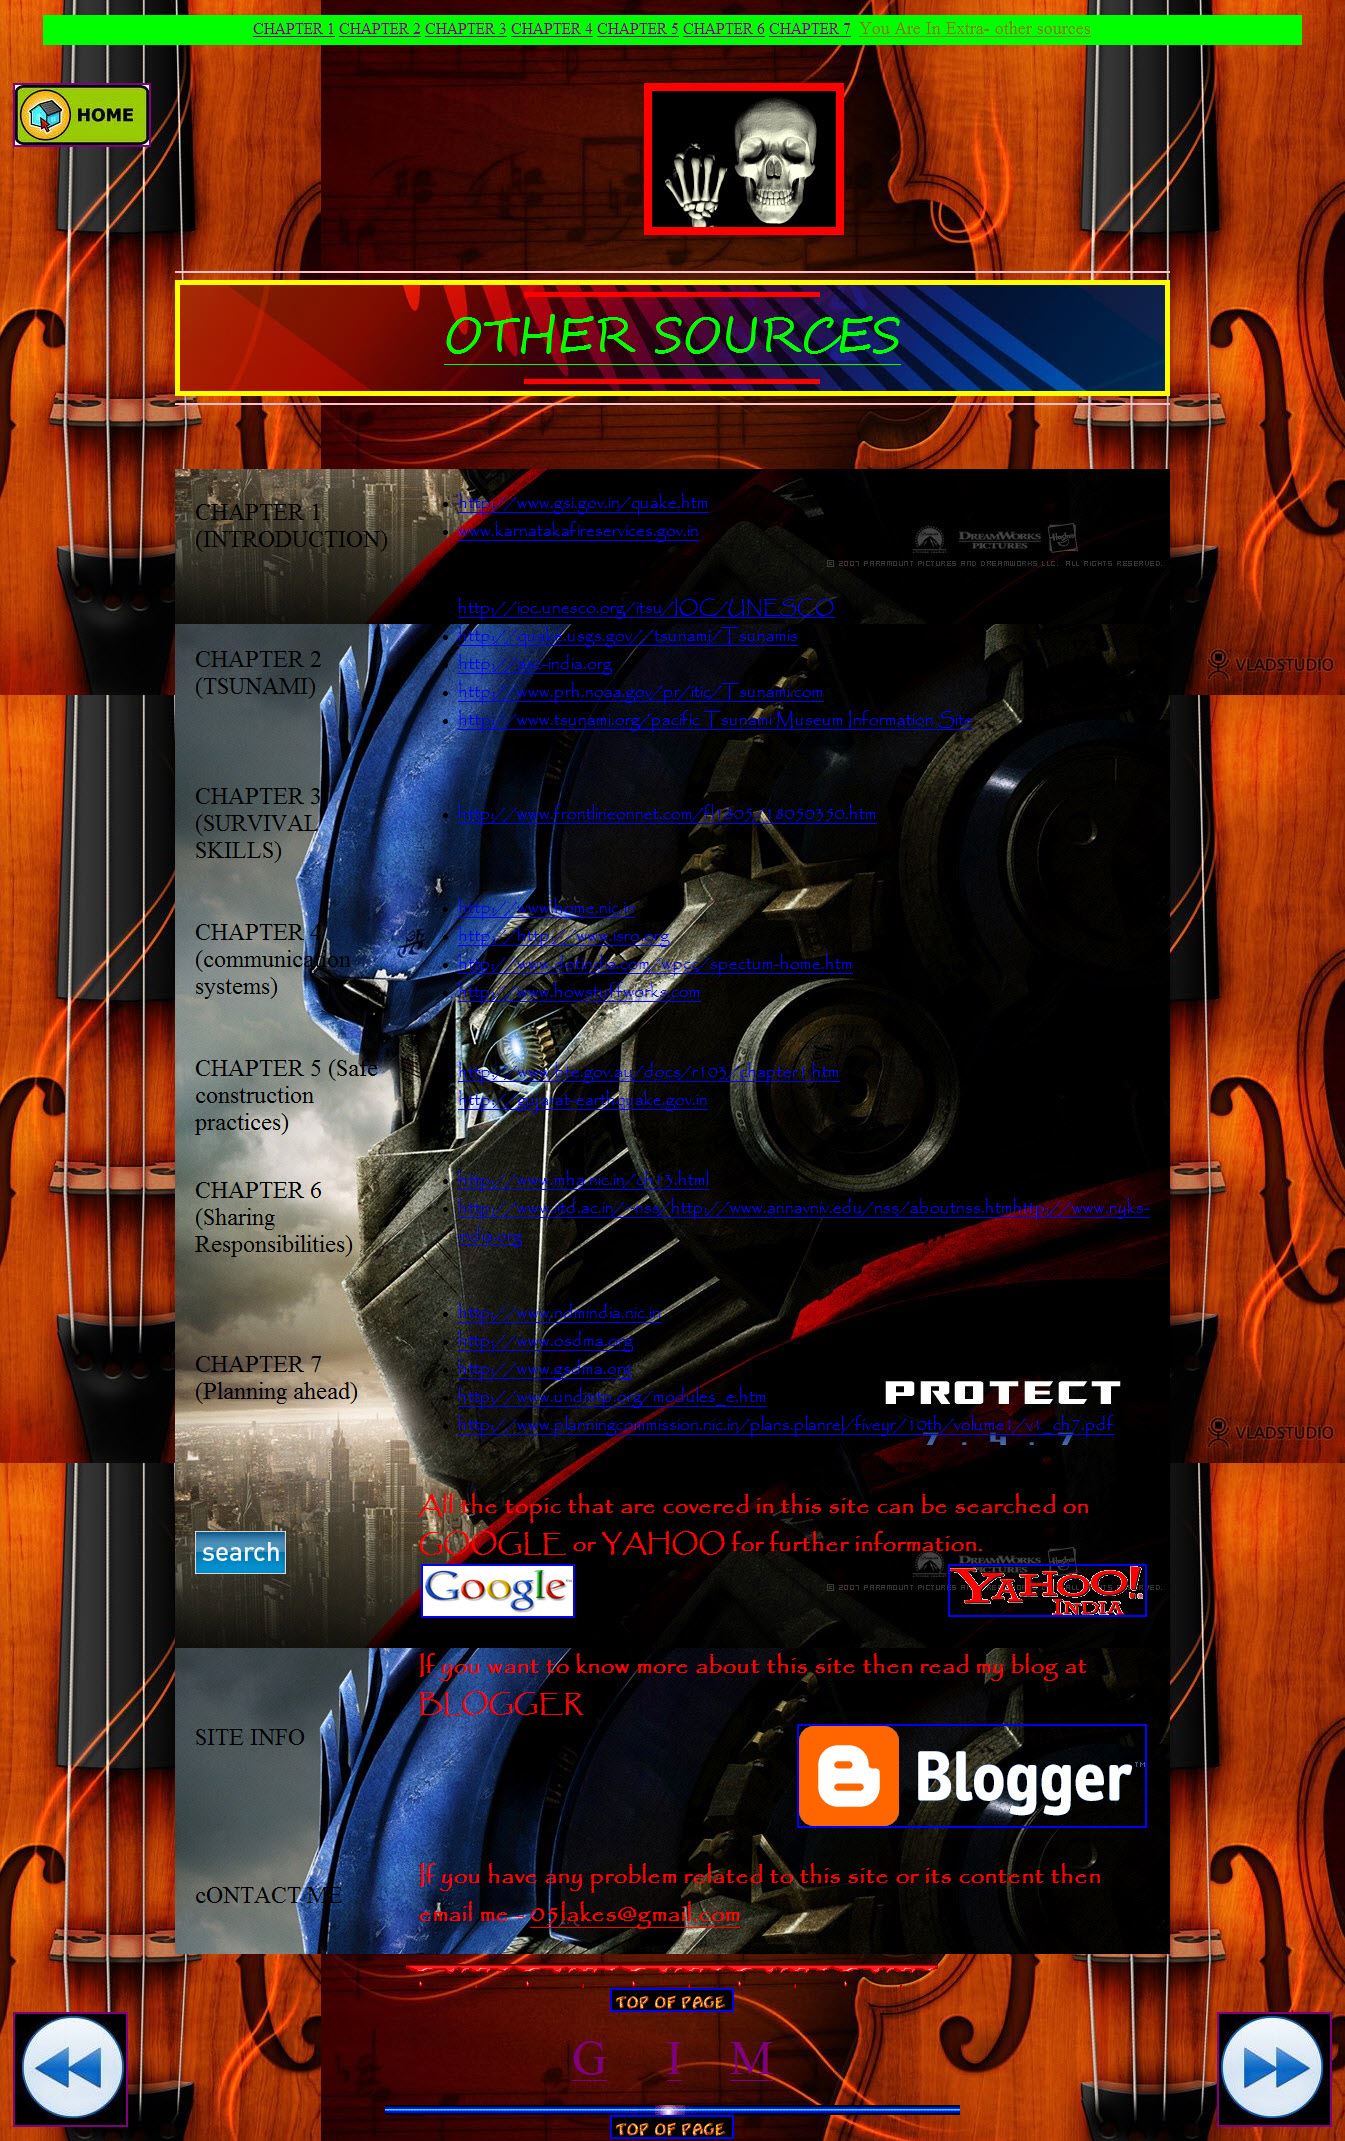
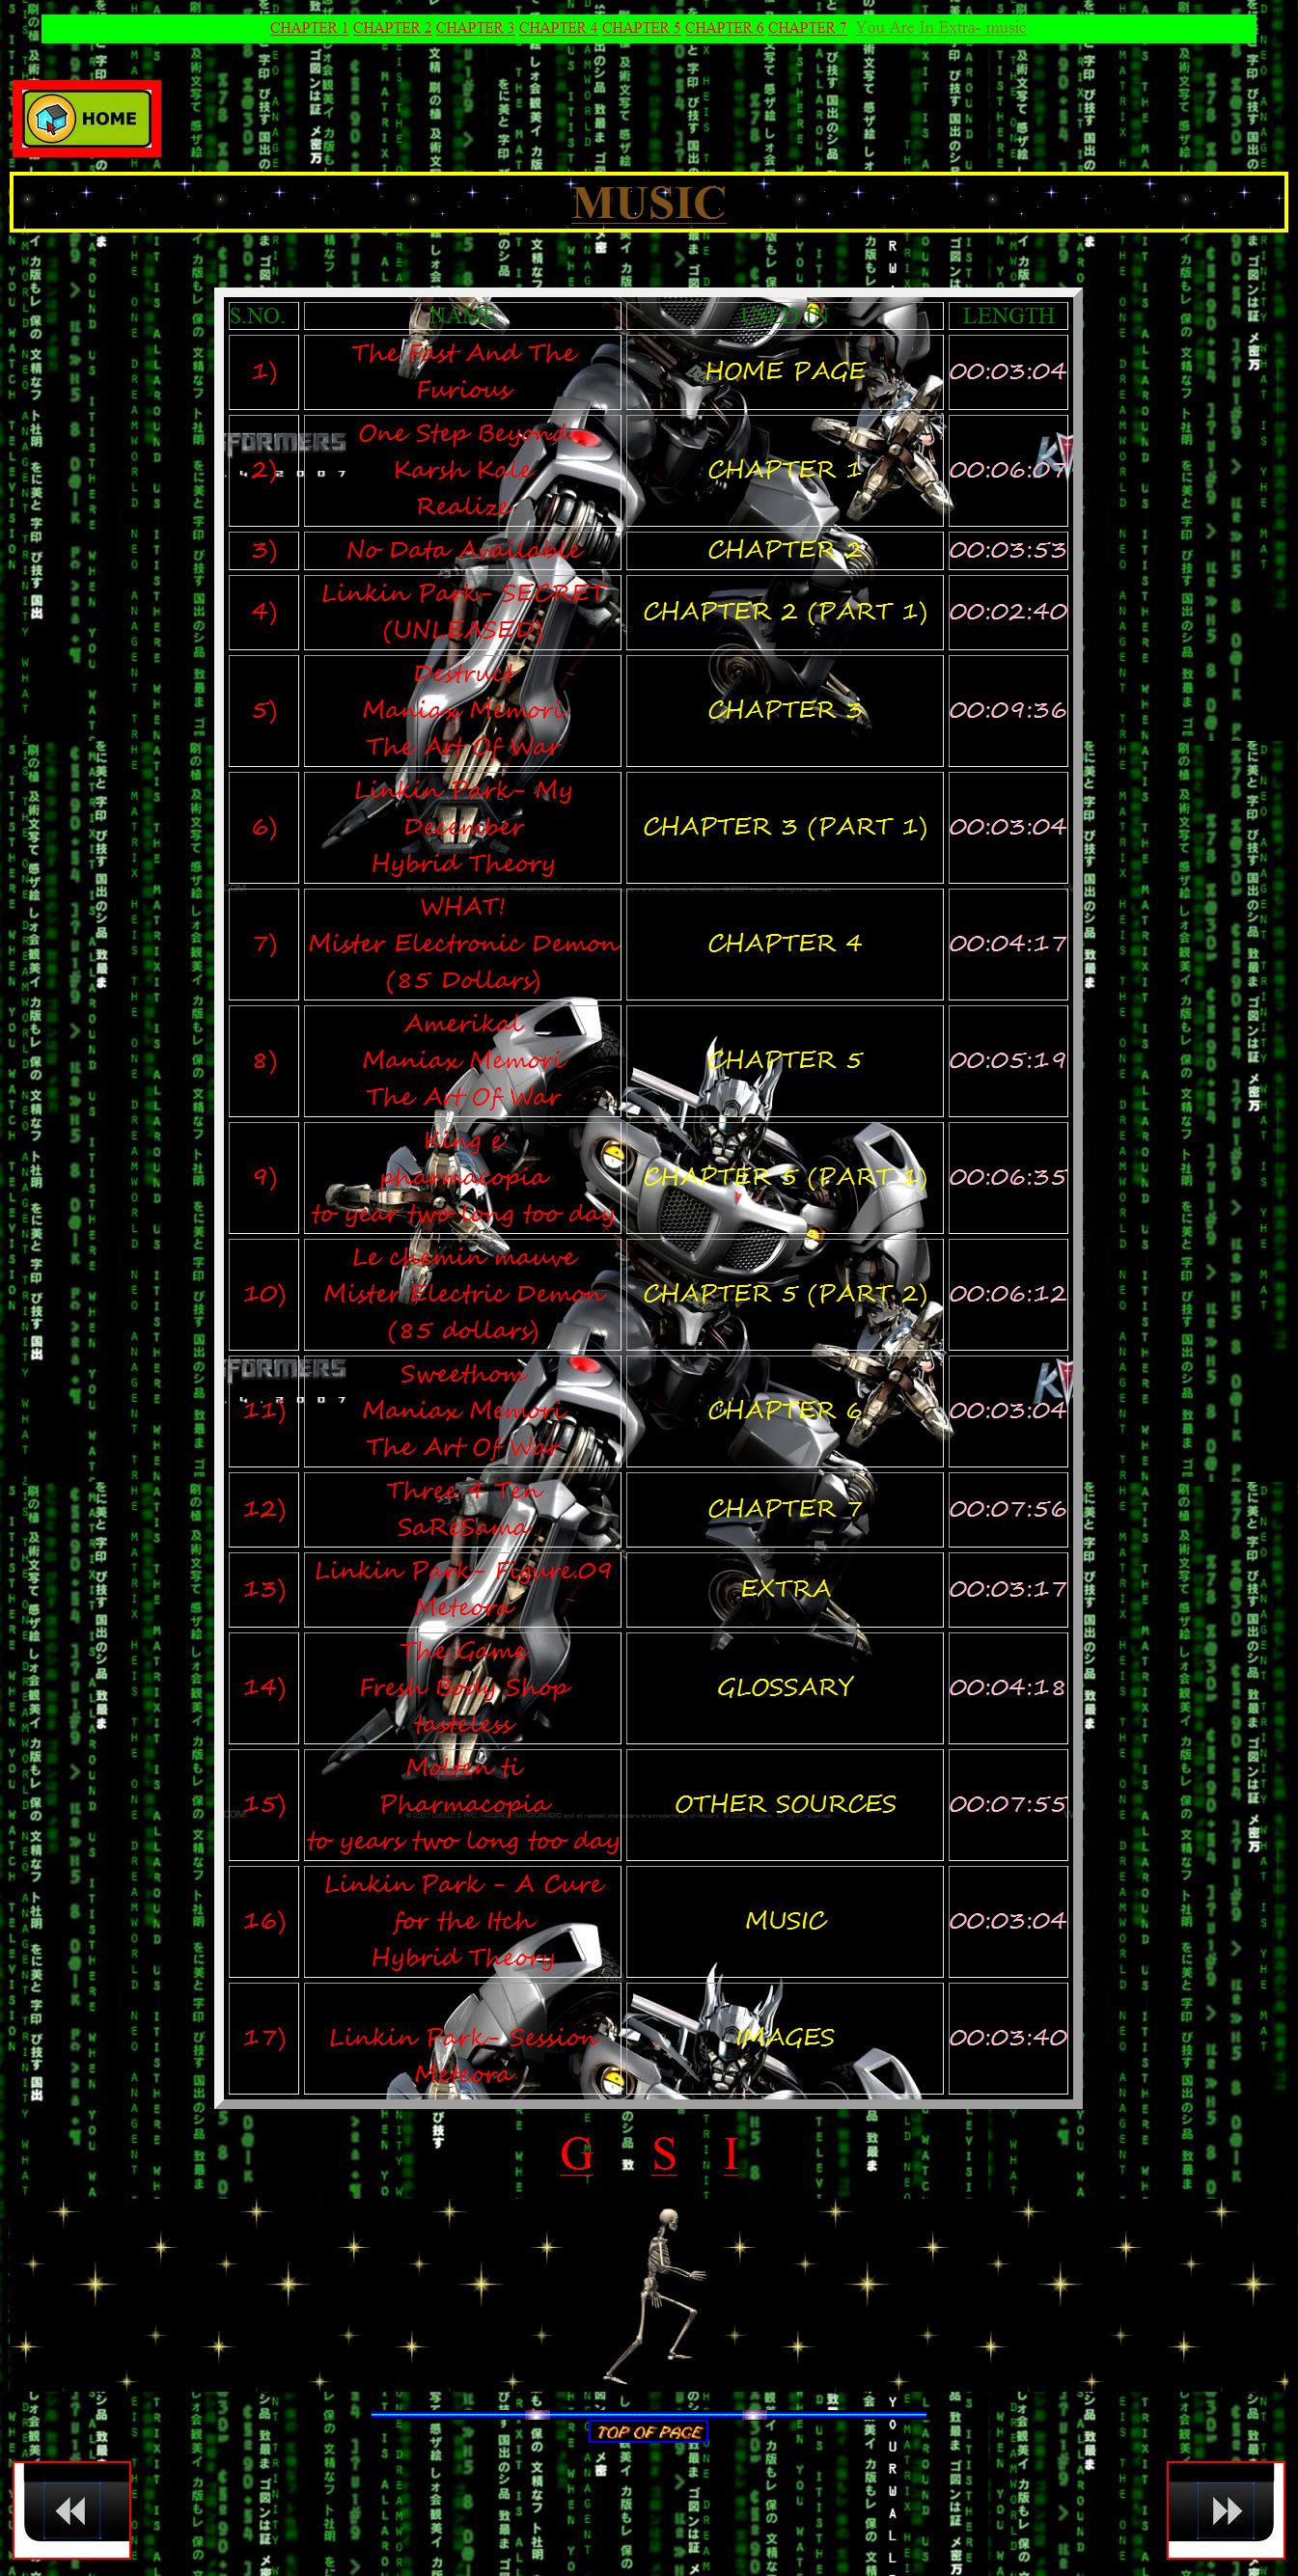
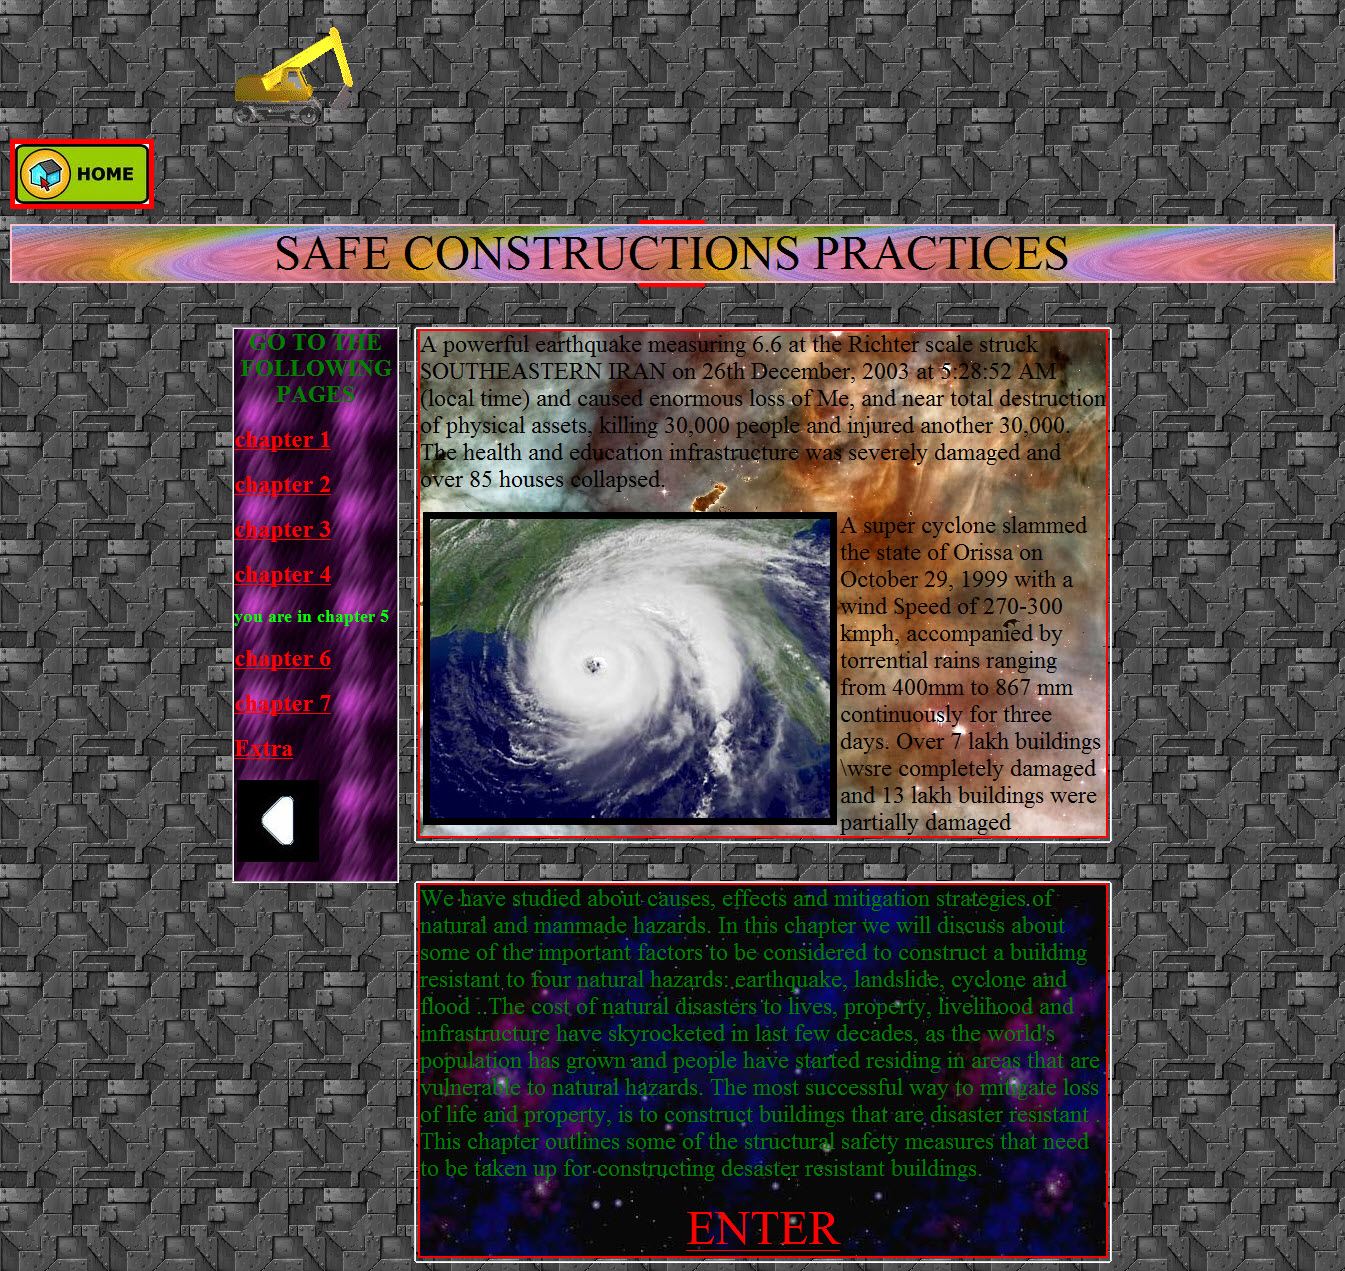
Here are a few snap shots of web pages which I created. ( all the images and audio used to create web pages are owned by their copyright holders )
WHAT IS a WEBSITE?
Well, a website is a collection of webpages, photos, articles, videos or any other digital media organized perfectly so that users can easy navigate around it and find the information which they came seeking. Wonderhowto.com is a perfect example of a website. A website are hosted on web servers connected to Internet or private networks such as Intranet. Every website is identified with its uniques URL or IP address, even every digital media hosted on a website has its own URL ( Uniform Resource Locator ). Every website has its own top-level domain extension such as --
.com - Commercial websites
.net- Network related websites
.edu - Educational related websites
.org - organisation related websites
There are much more.
There are even country based domain extension, such as -
.in - INDIA
.au - AUSTRALIA
.br - BRAZIL
.co - COLOMBIA
.eg - EGYPT
There are lot more.
HTML PROGRAMMING
HTML ( Hyepr Text Markup Language ) is the language used to create webpages. Almost everybody who is involved with the internet or web designing needs to have a basic understanding of how HTML works or HTML codes are written. An HTML file contains "markup tags" that tell the browser how to follow instructions within these tags.
Now from here we start our journey to Web page designing just using Very basic HTML programming. I recommend you to write each and every HTML code you see here or anything you learn from it by your own so that you can learn it very quickly.
Here I am not going to talk about CSS, JavaScript, PHP and other languages. As I said earlier I will tell you how to design Amazing webpages using basic HTML!
Step 1: STUFFS YOU NEED
- Editor- First of all you need a editor program on which you will write your HTML codes. I recommend you to use Notepad++ ( a free program ), its very easy to use and you can easily manage your complex HTML codes with ease as it show HTML tags, attributes and contents with different colors.
- Image Editor - Well you don't need any software for editing image or any other software like Photoshop for graphics because we will be using Internet to get all our resources that we will use on Web Pages.
- Creative - You should have very creative thinking and should not stop experimenting. If you have these then you can surely make amazing web pages just by using basic HTML.
Install Notepad++ and start it. The interface of this software could be something like this
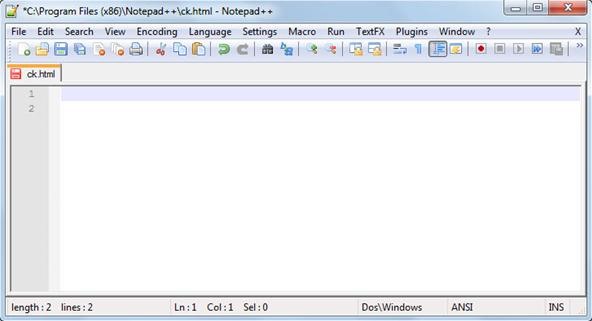
- First first that you should do immediately is to save it with any name with extension ".html" or ".htm". Ex- ck.html
Here .html or .htm extension tells the Web Browser that its a HTML file.
Warnings
- Here I am just going to show you how to create web pages with basic HTML which will give you basic ideas of HTML or Web page designing. So, if you are planning to build you own site, then just don't go for basic. Try learning other programming languages like php, javascript, css, etc which will help you make professional looking websites. But before moving to advance designing you need to have basic concept.
Step 2: LET GET STARTED with the BASIC
- Every Web page starts with the <html> tag telling the web browser the start of the HTML document and ends with </html> which indicates the browser that it is the end of the HTML document, there are even more tags which you will be learning further, but one thing which you will see that these tags <html>, <body> etc are not displayed in the web browser. The browser only displays the content between the tags, but the tags themselves are hidden.
- Here is the Syntax of a <html> tag or we can say, the basic structure of the web page -
<html><head><title>xxxxxxxxxxxxxxxxxxxxxxx</title></head><body>xxxxxxxxxxxxxxxxxxxxxxxxxxxxxxxxxxx </body></html>
Let me explain you the two types of tag before we go further:
- Container tag/Non-Empty tags - Container tags are also known as Non-Empty tags. These types of tags requires opening as well as closing.
Example: <html>, <head>, <title>, <body>, <i> these types of tags requires closing.
Every container tag is closed by giving a slash sign ( / ) just before the name of the tag
Example: </html>, </head>, </title>, </body>,</i> are the examples of closing tags.
B. Empty tag/Non-Container tags - Empty tags are also know as Non-Container tags. These types of tags don't requires closing even if you have opened it.
Example: <br>, <img>, etc
- Attributes - Every tag have their own attributes and each attribute provide additional information about an tag. Attributes are always used withing the tag and in the following manner -
<tag attribute="value">
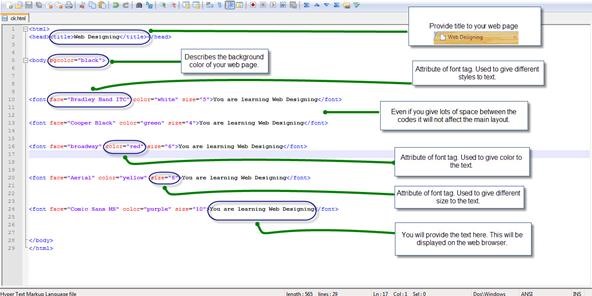
The following example will make it clear - Suppose if you want to have background color of your web page as black then you will use "bgcolor" attribute within the <body> tag.
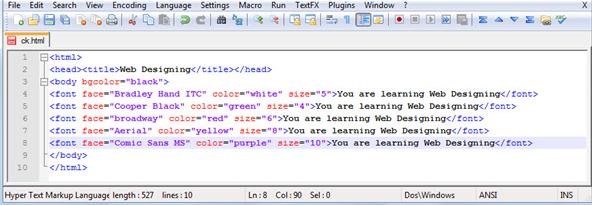
Open Notepad++ and type the following code -
<html><head><title>Web Designing</title></head>
<body bgcolor="black">
<font face="Bradley Hand ITC" color="white" size="5">You are learning Web Designing</font>
<font face="Cooper Black" color="green" size="4">You are learning Web Designing</font>
<font face="broadway" color="red" size="6">You are learning Web Designing</font>
<font face="Aerial" color="yellow" size="8"> You are learning Web Designing</font>
<font face="Comic Sans MS" color="purple" size="10"> You are learning Web Designing</font>
</body></html>
As you have already saved it with .html extension ( if not done then do it now ), you just need to click on "Save" option from "File" menu on the menu bar.
As you can see main tags have "light blue" color, contents that are displayed on web browsers have "black" color, attribute have "red" color while value of attributes have "purple" color. This is the main reason why we use Notepad++, you can easily distinguish all stuffs very easily.
- Open the saved file using any Web Browser.
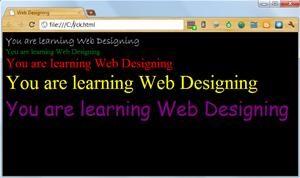
The following code could give this type of output -

Here is the explanation to the the HTML code of this Web page:-
As you see here that all the text are in written in one complete line, but you can change it by using <br> [break tag. Its a empty tag] or <p> [paragraph tag. Its a container tag].
You need to use it just where you want to break the line ( <br> ) or from where you want to start a new paragraph ( <p> ).
After you use <br> tag or <p> tag you will see the output like this:- You can also use the hexadecimal number of any color. Like you can also use this line for displaying text in red color -
<font face="broadway" size="4" color="#FF0000">
Warnings
- Font styles are only displayed by web browsers only if the user have that font styles installed on their computer. Many computers may not support the font styles you use in your web pages, so you should use the most common font styles.
GIVE MORE BEAUTY to YOUR TEXT
Now you have learned how to assign size, color, face to your text in web pages. Now let us learn how to make text look BOLD, italic and underlined!
- To make text look BOLD in your web pages use <b> tag. Its a container tag so you need to close it every time you open it
Example of <b> tag:-
<b>You are learning Web Designing</b>
- To make text look Italic in your Web pages use <i> tag. Its also a container tag so you need to close it every time you open it.
Example of <i> tag:-
<i>You are learning Web Designing</i>
- To make text look underlined, you have to use <u> tag. Its also a container tag.
Example of <u> tag:-
<u>You are learning Web Designing</u>
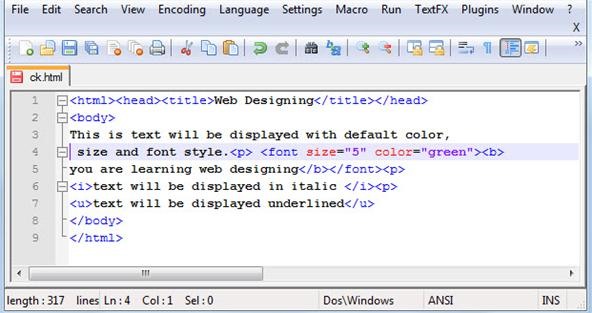
Here is how you will type it on the Notepad++
<html><head><title>Web Designing</title></head>
<body>
This is text will be displayed with default color, size and font style. <font size="5" color="green"><b>you are learning web designing</b></font>
<i>text will be displayed in italic </i>
<u>text will be displayed underlined</u>
</body>
</html>
Here is how you will put the code in Notepad++
Warnings
- While using two or more container tags on text, you should take very care while closing those tags. Suppose you opened <font> tag for a text before <b> tag then you should close that <b> tag first then <font> tag.
If the opening pattern of tags are like this --- any tag A > any tag B > any tag C
then the closing pattern of tags should be like this --- any tag A < any tag B < any tag C
The grater sign in opening pattern of tags shows that "tag A" have be opened before "tag B" and "tag B" have been opened before "tag C"
And the less than sign in closing pattern of tags shows that "tag A" have been closed at last, "tag B" have been closed just after "tag C" while "tag C" has been closed at the first.
It might have got very confusing here. Don't worry I fill show you with an example -
Suppose here is the code--
<font><b><i>You are learning Web Designing</i></b></font>
as you can see the closing pattern of tags is just opposite of the opening pattern of the tags
similarly, if
<font size="6"><b><i><u>You are learning Web Designing</u></i></b></font>
here also the closing pattern of tags is just opposite the opening pattern of tags.
You should also know that use of attributes in any tags will not change this method. As here size attribute of font tag doesn't change the closing pattern.
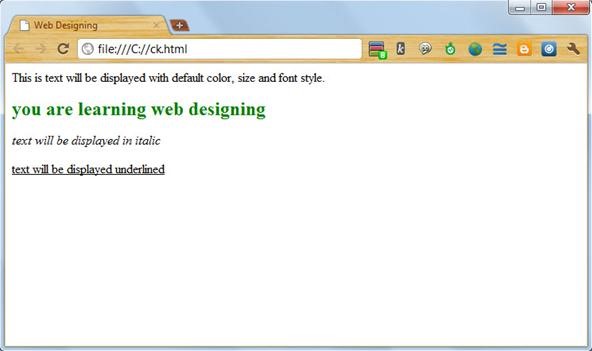
The <b>, <i> and <u> tags which we saved earlier will give this output:-
ADDING HEADINGS
There are six levels of heading in HTML. These are -
- <h1> </h1> -- the biggest
- <h2> </h2>
- <h3> </h3>
- <h4> </h4>
- <h5> </h5>
- <h6> </h6> -- the smallest
This is how you will use the heading tags in your web page -
<h1> example of heading </h1>
<h2> example of heading </h2>
<h3> example of heading </h3>
<h4> example of heading </h4>
write similar to his upto <h6> and you can even use font , bold, italic, underline tags to customize it more
The output will be like this:-

WHAT YOU HAVE LEARNED in THIS STEP
You learned the following things:-
- Basic structure of web page
- what are container and non-container tags.
- How to add text, background color and title to you web page
- How to make your text more customized using bold, italic, underline and heading tags and some attributes.
- What should be the closing pattern of tags.
Step 3: CUSTOMIZING YOUR WEB PAGE
Customizing your web page means enhancing the look of your page. You can do this by adding pictures, videos and other media files too such as audio clips (.mp3, .wmv, etc)
ADD BACKGROUND IMAGE
Here I will tell you how you will add images to your web pages instead of colors as we did earlier.
For adding image as a background of your web pages you can choose either of the following options:-
- Using Background attribute:
By using background attribute you can easily add image as a background. This is how you will be using it-
<body background="image source">
Here you will replace "image source" [without the quotes] with the complete path of the image.
Example: Suppose your image is stored in the folder named "images" located in the "E" drive of your computer, then you will be using the following path for this image:-
E:\image\something.jpg
Here something.jpg is your image name with .jpg extension.
Tips
- You can even know the compete path of your images by opening it with internet explorer. You can do it by right clicking the image and selecting Internet explorer or any other browser from the open with option.

- You can use "bgcolor" and "background" attribute at the same, just to ensure that the web browser displays the color assigned if it fails to show the background image.
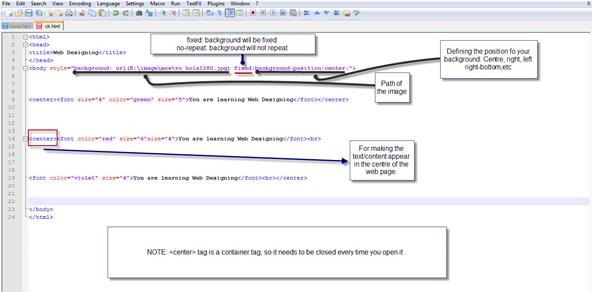
- Using the Style Attribute:
This method gives you more flexibility and command over your background images. Use the following code:-
<body style="backgound: url(E:\image\eye candy wallpapers 2 by deadpxl.jpg) fixed;background-position:centre;border:10;">
See image for more details
This will be the output:

ADDING IMAGE to YOUR WEB PAGE
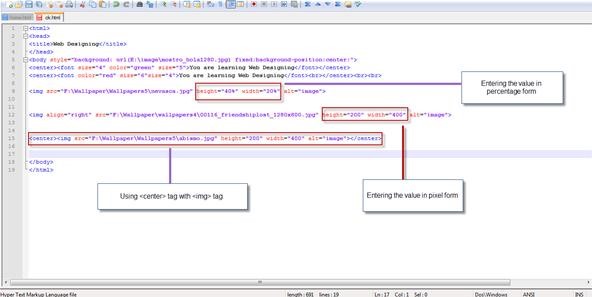
- For adding images to your web pages you will be using <img> tag. Some of the attributes of <img> tag are:
- alt: every text assigned with this attribute will be displayed by the web browser when the image will be being loaded or if its unable to display the images.
- src: you will use this attribute to assign the path of the image you want to display on your web page
- height/width: these attributes are used to assign height and width of the image. You can set the height and width of you image by either percentage value or by pixel value.
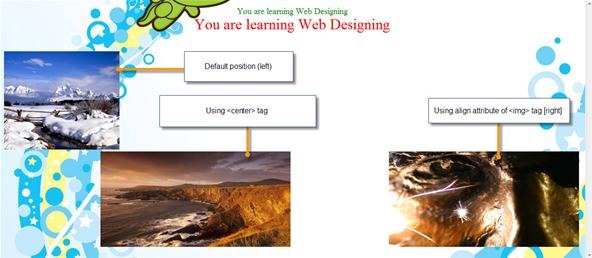
- align: using this attribute you can position your images either on right or left side of your web page.
See image for more instructions:
The output would be like this:
Tips
- You can also apply border to your image by using "style" attribute:
<img style="border:5 solid yellow" src="F:\Wallpaper\Wallpapers5\abismo.jpg" height="200" width="400" alt="image">
OR
<img style="border:5 dotted red" src="F:\Wallpaper\Wallpapers5\abismo.jpg" height="200" width="400" alt="image">
You can choose any size and color of your border but remember to use "solid" or "dotted" before color name.
Applying border could give this type of images:-

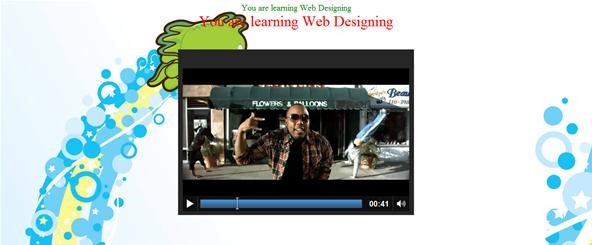
ADDING VIDEO to YOUR WEB PAGE
- You can simply use <embed> tag to add videos.
<embed src="E:\image\video1.mp4" height = "350" width="500" autostart="false"></embed>
If you change the "autostart" value to "true" then your video will start playing as soon as you open your web page.
ADDING AUDIO to YOUR WEBPAGE
- You can add music to your web page in the same way to added video. Just instead of video file path use the path to your music file.
<embed src="E:\image\song.mp3" height="100" width="100" autostart="false"></embed>
If you use this tag then you will see a audio player on your web page.
- You can also run any audio file in the background by using this tag:
<bgsound src="E:\image\ck.mp3" loop="infinite">
Here "loop" represents the number of times you want to play the audio. You can use 0, 1 ,2 or any other number, depending on your interest.
Use this tag just after the <body> tag:
<body><bgsound src="files/ck.MP3" loop="infinite">XXXXXXXXXXXXXXXXXXXXXXXXXXXXX</body>
Using <bgsound> tag will not add any music player to your web page but still you will be hearing it.
WHAT YOU LEARNED in THIS STEP
You learned following things:
- How to add image as a background.
- How to add images within your webpage.
- How to add Video, audio and background music to your web page.
Step 4: ADD LINKS, TABLES, LISTS and COMMENTS to YOUR WEB PAGE
Here you will learn how to link pages, add tables, lists and even comments to your Web page.
ADD LINKS
- If you want to link a different site or any other web page, then you have to use <a> tag also known as anchor tag. If your web page is named "something.html" and is stored in the folder named "webpages" and you wanna link it to your web pages, then you will use the following code:-
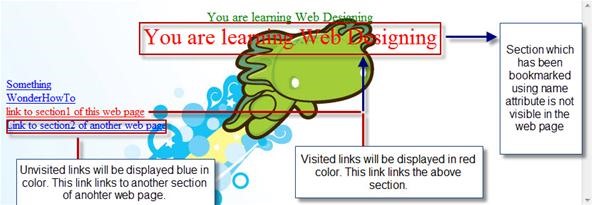
<a href="webpages/something.html" rel="nofollow" target="_blank" >Something</a>
This code will display the text "Something" in a underlined blue font, the same as this one WonderHowTo. If you want to change the color of the unvisited , visited and active link, then you have to use the following attribute with the <body> tag:-
<body link="blue" alink="purple" vlink="red">
- If you want to link any Website to your web page then use the URL of that web page withing the <a> tag -
<a href="https://www.wonderhowto.com/">WonderHowTo</a>
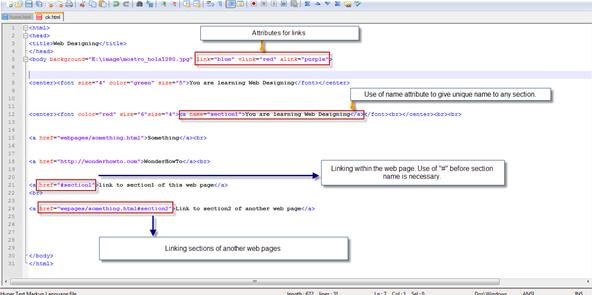
GIVE NAME to ANY SECTION of YOUR WEB PAGE
- You can use "name" attribute of the <a> tag to give unique name to any section of your web page. In other words, You create a bookmark within your web page. You can use this bookmark to create links directly to this section -
<a name="section name">My section</a>
- Now you can create direct links to the section named "My section" withing the same web page using this code format -
<a href="#section name" rel="nofollow" target="_blank" >Link to My section of this web page</a>
- If you want to link this section from another web page, then use this code format:-
<a href="ck.html#section name">Link to the My section of ck web page</a>
See image below for more reference:-
The output could be like this one:-
ADDING CLICKABLE IMAGE
- To make any image clickable, you just need to use <a> tag before the <img> tag.
Here is an example:
<a href="http://google.com" rel="nofollow" target="_blank" ><img src="path of the image"></a>
So, any click on this image will redirect the web browser to google.com
ADDING TABLES to YOUR WEB PAGE
- You add tables in you web page using <table> tag. For rows you have to use <tr> tag and each column is divided into cells using <td> tag. The syntax of <table> tag:-
<table><tr><td>xxxxxxxxxxxx</td><td>xxxxxxxxxxxxx</td></tr>
<tr><td>xxxxxxxxxxxxxx</td><td>xxxxxxxxxxxxxxxxxxx</td></tr>
</table>
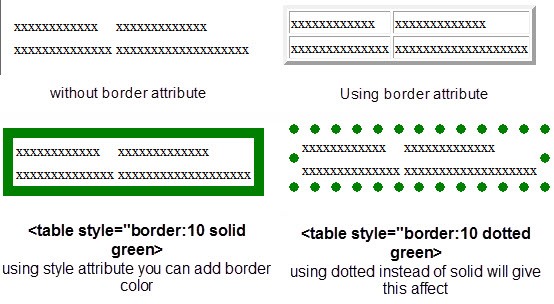
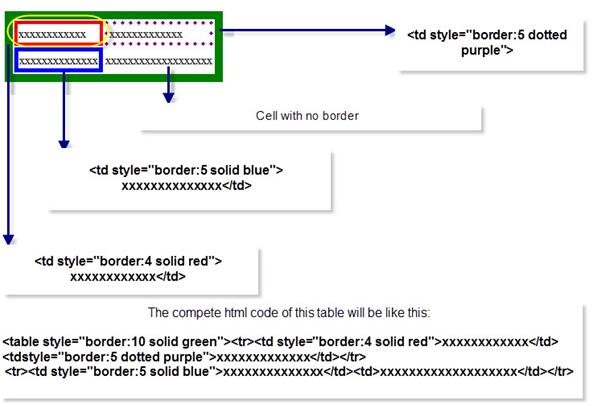
If you will use "border" attribute then assign it some value then the table will be displayed with borders but if you will not use "border" attribute, the the table will have no border.You can also assign different colors to border.
If you want to give different border size and color to each cell, then separately use "style" attribute with <td> tag.
- Cellpadding and Cellspacing:
- Cellpadding:
Cellpadding is an attribute of <table> tag. By using cellpadding attribute you can set the amount of space between the contents of the cell and the cell wall.
Ex:- <table cellpadding="4">
- Cellspacing:
Cellspacing is also an attribute of <table> tag. By using cellspacing attribute you can set the amount of space between the table cells.
Ex:- <table cellspacing="4">

ADDING BACKGROUND COLOR and IMAGE to TABLE
- BACKGROUND COLOR:
You can background color to your table and cells simply by using "bgcolor" attribute.
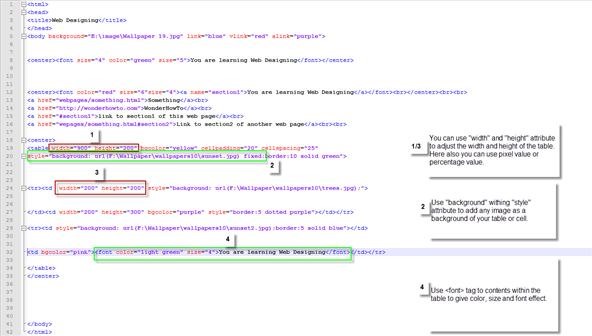
<center><table bgcolor="yellow" cellpadding="20" cellspacing="25" style="border:10 solid green">
<tr><td bgcolor="light blue" style="border:4 solid red">xxxxxxxxxxxx</td>
<td bgcolor="purple" style="border:5 dotted purple">xxxxxxxxxxxxx</td></tr>
<tr><td style="border:5 solid blue">xxxxxxxxxxxxxx</td>
<td bgcolor="pink">xxxxxxxxxxxxxxxxxxx</td></tr>
</table>
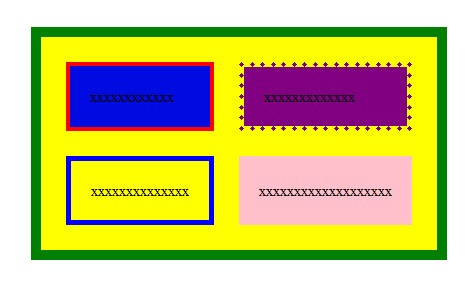
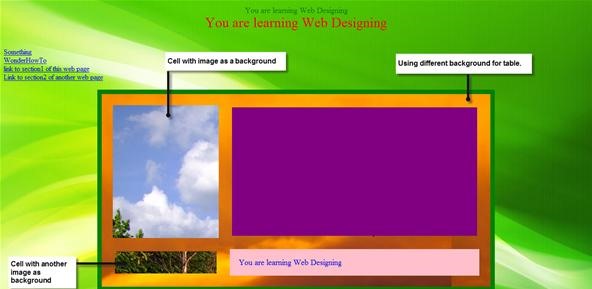
- BACKGROUND IMAGE:
If you think that adding colors as a background in you table is not so appealing, then no problem. You can use background attribute to add any images as background of your table or to each cell separately.
See image for more reference.
Output:-
ADDING LISTS to YOUR WEB PAGE
There are three types of lists in HTML:-
- Unordered Lists
- Ordered Lists
- Definition Lists
UNORDERED LISTS
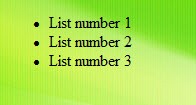
An unordered list starts with the <ul> tag and each list item starts with the <li> tag.
Example:-
<ul>
<li>List number 1</li>
<li>List number 2</li>
<li>List number 3</li>
</ul>
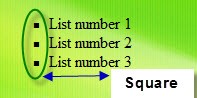
Output:- All the list items written within <li> tag will be displayed with bullets. If you want to change the shape of these bullets from circle to square then use "type" attribute.
Example:-
<ul type="square">
<li>List number 1</li>
<li>List number 2</li>
<li>List number 3</li>
</ul>
Output:- Try using "disc" value in "type" attribute!
ORDERED LIST
An ordered list starts with the <ol> tag and each list start with <li> tag.
Example:-
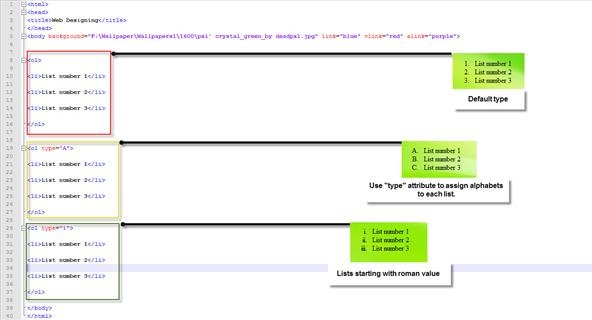
Try this tag yourself and see the effect:- <ol type="I">
Suppose you want to start your list with number 5 or any alphabet C instead of 1 or A, then try using "start" attribute.
Example:-
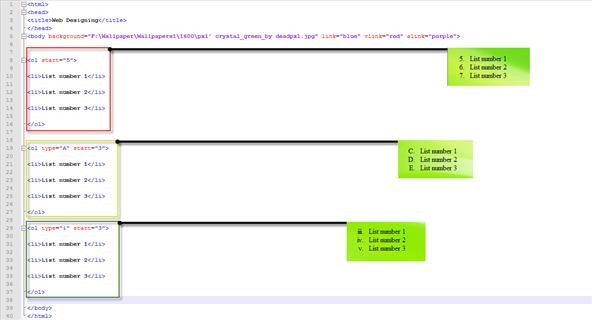
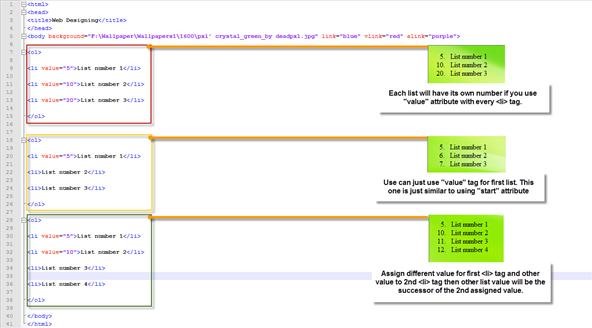
You can get the same result but by using different method. If you use "value" attribute with <li> tag then you will get the same result. But here is a twist, suppose you started your first list with number 5 but wanted to list second item with number 10, then you will use the following cod:-
<ol>
<li value="5">List number 1</li>
<li value="10">List number 2</li>
<li value="20">List number 3</li>
</ol>
See image below for more reference/Idea:-
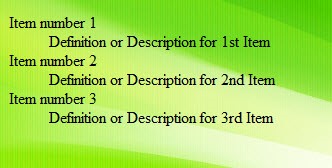
DEFINITION LIST
Definition list contains list of items with a description or definition of each item.
Every definition list start with <dl> tag and ends with </dl> tag.
<dt> tag which is used within the <dl> tag defines a definition list. <dd> tag which is used within <dt> tag defines the description for each list.
Example:-
<dl>
<dt>Item number 1</dt>
<dd>Definition or Description for 1st Item</dd>
<dt>Item number 2</dt>
<dd>Definition or Description for 2nd Item</dd>
<dt>Item number 3</dt>
<dd>Definition or Description for 3rd Item</dd>
</dl>
Output:-
NESTED LIST
Nested list is not any new type of list but a combined use to unordered list and ordered list.
Here is an example of Nested list:-
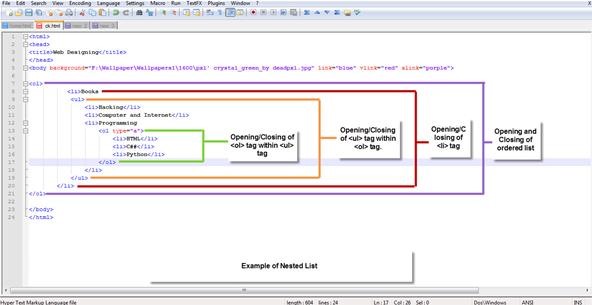
Output:-

If you are still confused about how to create Nested list then Following the instructions below:-
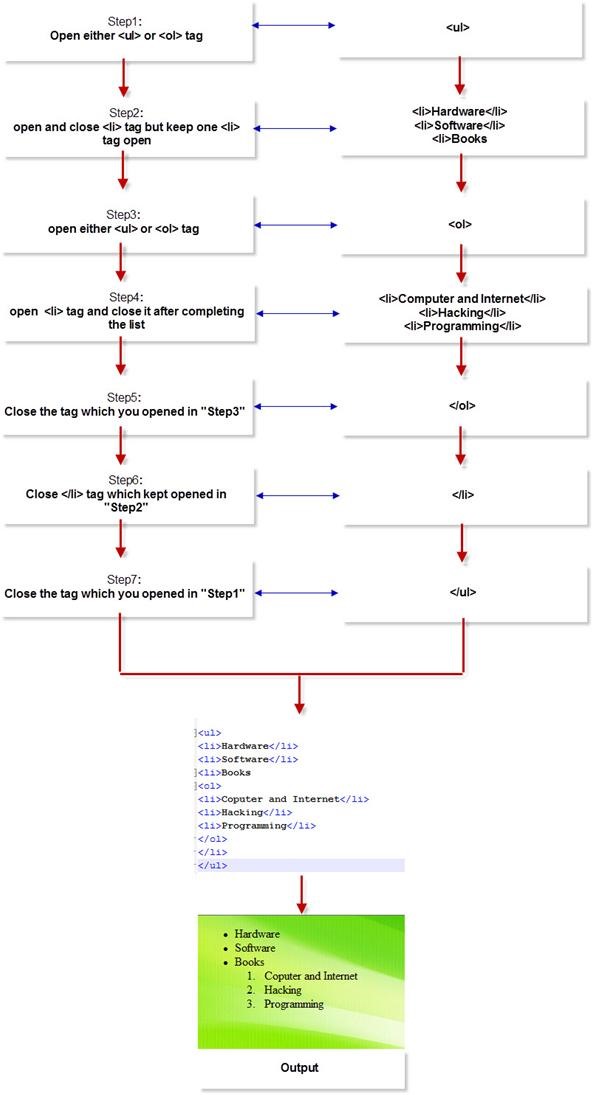
Hope this helps you!
ADDING COMMENTS to YOU HTML CODE
The comment tag is used to add comments to your HTML code or source code. Contents within these tags are not displayed by the browser. Comment tag is just used to keep you HTML code confusion free or add description if youR Web Page has very complex source code. Adding comment tag helps you when you edit the code for updating your web page.
Example of Comment tag:-
<!--Text within these tags are not displayed by the Web Browser-->
WHAT YOU LEARNED in THIS STEP
- How to add links, make images clickable and give name to any section of web page.
- How to add table and customize it.
- How to add ordered, unordered, definition and nested list.
Step 5: ADD MORE EFFECTS to TEXT and YOUR WEB PAGE
ADD HORIZONTAL LINE
If you want to add a horizontal line in your web page, then you have to use <hr> tag. Its a non-container tag, so you don't need to close it.
Attributes of <hr> tag:
- Width:- Assign value in pixel or percentage.
- Size:- Assign value in pixel or percentage.
- Align:- Assign value ( left, center, right ) to specify the alignment of horizontal line.
- Color:- Give color to Horizontal line
- noshade:- This attribute specifies that horizontal line should be displayed without shaded.
- Style:- You can use this attribute to give dotted or solid border of any color to it.
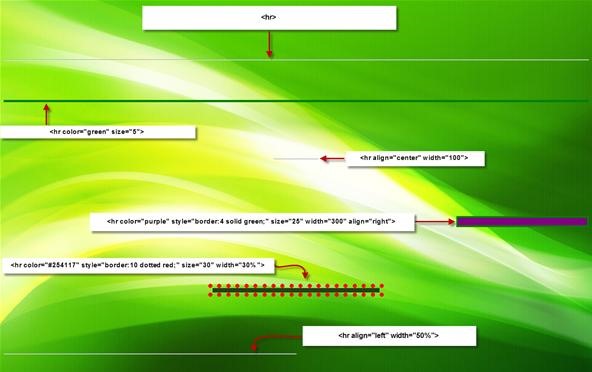
Different types of horizontal line with their codes
ADD MARQUEE EFFECT
By using <marquee> tag you can make text, photos, horizontal line and many more things scroll horizontally or vertically automatically.
Attributes of <marquee> tag:-
- Scrollamount:- Scrollamount attribute defines the value by which the content withing <marquee> tag should move.
- Direction:- Direction attribute defines the direction in which the content should move. ( right, left, up and down)
There are many more.
Try using these examples and modify it according to your needs:
- <marquee scrollamount="12" direction="right">You are learning Web Designing</marquee>
- <marquee scrollamount="2" direction="left">You are learning Web designing</marquee>
- <marquee behavior="alternate" width="600" height="100"><font color="red" size="5"><b>You are learning Web designing<b></font></marquee>
- <marquee behavior="scroll">You are learning Web Designing</marquee>
- <marquee behavior="slide">You are learning Web Designing</marquee>
- <marquee direction="up">You are learning Web designing</marquee>
- <marquee direction="down">You are learning Web designing</marquee>
- <marquee bgcolor="yellow" vspace="50" hspace="50"> You are learning Web designing</marquee>
Here "vspace" means "vertical space" and "hspace" means "horizontal space". Assigning value to these attributes will leave space vertically and horizontally.
- <marquee scrollamount="20" loop="2"> you are learning web designing</marquee>
Tips
- You can also add <marquee> tag before <hr> tag to make it scroll in any direction.
- You can use <marquee> tag for creating sliding images.
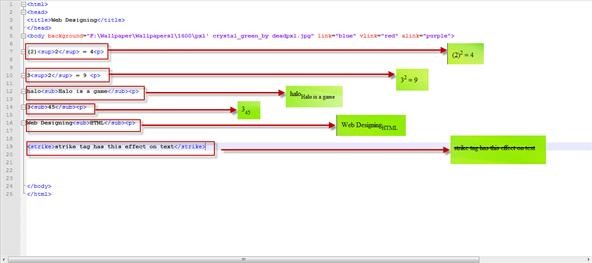
ADD SUBSCRIPT, SUPERSCRIPT and STRIKE
- SUBSCRIPT and SUPERSCRIPT:
Use <sub> and <sup> tags to give subscript and superscript affect to any text or number. Generally, these tags are helpful while creating Science subject (mathematics, physics, chemistry, etc) related web pages.
- STRIKE:
This tag ( <strike> ) will display a line through the middle of the text.
Example:-
NOW GET READY to EXPERIMENT
I should now stop here because this article has already reached more than 5 thousand words and if I keep writing then this article will no longer be called as "How-To-Design Amazing web pages using basic HTML" but may get a tag of "Basic Web Designing Manual". But, you now know almost very much of the basic HTML. Just Go and keep experimenting and exploring with your existing knowledge!
Happy Web Designing!!
Just updated your iPhone? You'll find new emoji, enhanced security, podcast transcripts, Apple Cash virtual numbers, and other useful features. There are even new additions hidden within Safari. Find out what's new and changed on your iPhone with the iOS 17.4 update.


10 Comments
Web design is really a significant issue for website and as a web designer when I do web design I've need to take at least 10 cups of tea. Thanks for have a nice expose. Keep it up
Amazing article,I understood how to create a web page in a easy way...Thanks for explanations.
thks for very usefull this website
thks for explanation
Very Useful.! thank you so much. I owe you a lot. :)
Just the basics... -1
Thanks for the explanation :)
itss.....easy but how we create a webpage with more creativity......
nice i am comfertable with this work of html simple way
thank you so much for this tutorial keep up the good work
Share Your Thoughts